| |
— Before installation, please read these instructions carefully.
— The floor heating cables must be installed by an
authorised person only.
— Installation must be carried out in compliance with
the country’s safety regulations.
— Avoid cutting or twisting the heating cable, as well as excessively bending or straining it.
— Place the ends and connector joints of the cable in
the same ambient conditions as the cable itself.
— Carefully observe the installation and operation
instructions.
— Test the heating cable by measuring its active and
insulation resistances before and after the concrete casting.
— Do not install the floor heating cable under the
permanently placed furniture like cupboards, etc.
— Do not install the heating cable in class 0 space.
— In rooms with explosive hazard, do not connect the
cable to the same group with other electric equipment.
— It is recommended to provide for the cable with a
suitable fault current protection.
— Make sure that bends of the heating cable do not
touch each other or overlap.
— Take care of making installation drawings for your
heating cable. These drawings, made preferably by a licensed designer who follows the manufacturer’s
instructions, would show the power and the length of the cable, the distance between its bends, and the
area of installation. Observe these drawings during
the installation and add any alterations you make.
— The warranty shall become effective only if the active and insulation resistances have been measured and
the corresponding table filled.
— Do not guide the heating cable through a thermal
insulating material or install it on such a material. To prevent the cable from overheating, lay it evenly in a uniform environment. Do not lay the cable over expan- sion joints and avoid places with excessive heat (like a fireplace or a sauna stove).
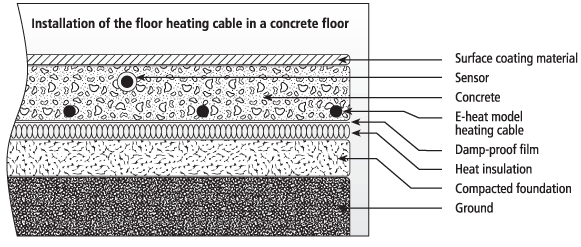
— Install the protective tube of the thermostat sensor so that the sensor can be replaced if necessary. Put the
sensor between the bends of the open cable, slightly above the plane of the cable, at a distance of approxi- mately 50 cm from the wall. The sensor must not touch the heating cable.
— Carefully clean the concrete surface before laying the cable on it. Remove any sharp objects.
Attach the fastening lath to the base made of the first batch of concrete. It is best to do this before the concrete has finally hardened. The fastening lath ensures the equal span between the bends of the heating cable, and prevents its contact with pipes. If the floor will be cast with a single batch of concrete, attach the heating cable to fittings.
The final casting must be 30 to 50 mm thick for direct heating and 50 to 80 mm thick for cumulative heating. For surface coating, use a heat-conducting hard material (like clay tile) for direct heating and an insulating material (like cork or parquetry) for cumulative heating. Do not turn the floor heating on before the casting has completely hardened (about 30 days for concrete and 7 days for compounds). The temperature of the heating cable is adjusted with the thermostat.
When installing the heating cable on a gypsum lath or a renovated floor, follow the instructions for concrete floor.
|
|